


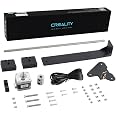
Creality3D Official Printer Ender 3 Dual Z-axis Upgrade Kit with Lead Screw, Metal Power Supply Holder and Stepper Motor, 3D Printer Ugrades Kit for Ender 3, Ender 3 Pro, Ender 3 V2
Details
- BrandCreality
- MaterialMetal
- ColorBlack
- Product Dimensions3.94"D x x
- Item Weight2.01 Pounds
Description
🚀 Upgrade Your 3D Game: Precision Meets Performance!
- ROBUST STABILITY - Say goodbye to layer ripples and hello to flawless prints.
- DEDICATED SUPPORT - Enjoy peace of mind with our responsive after-sales service.
- ELEVATE YOUR PRINTS - Transform your 3D printing experience with dual Z-axis precision!
- USER FRIENDLY DESIGN - Experience hassle-free leveling with synchronized X-axis movement.
- SEAMLESS COMPATIBILITY - Upgrade effortlessly with our versatile kit for multiple Ender models.
The Creality3D Official Printer Ender 3 Dual Z-axis Upgrade Kit enhances your 3D printing capabilities with improved accuracy, stability, and ease of use. Compatible with various Ender models, this kit ensures a seamless upgrade experience, backed by dedicated customer support.


Specifications
| Color | Black |
| Enclosure Material | Metal |
| Compatible Material | Metal |
| Compatible Devices | Laptop, Smartphone |
| Item Weight | 2.01 Pounds |
| Item Dimensions D x W x H | 3.94"D x 15.55"W x 2.56"H |
Have a Question? See What Others Asked
Reviews
K**C
Unnecessary without upgrading the original extruder too
I combined this upgrade with the Sprite Extruder Pro at the same time because i was worried about the extra weight of the new extruder on my plain single Z-axis Ender 3. So because i did 2 upgrades at once, i don't know if this kit had any effect on print quality since the extruder upgrade definitely did improve things.Based on my printing experience you don't need this kit by itself. The original extruder on a stock Ender 3 is going to be the main hardware holding back your print quality. But if you upgrade the extruder, you should probably get this kit too, and definitely get it if the new setup is heavier.I thought installation would be a lot easier than it was. I was expecting an adapter cable to plug into the existing original Z-axis cable as an extension but you actually get an entire new Z-axis cable that plugs into the mainboard. So that means opening up the mainboard area. I had no intention of leaving the original cable in there unattached so i also had to undo the wire bunch to remove the original one and wrap it all back up again.The assembly instructions are extremely minimalistic so i'd recommend watching a video first. I had to take apart the carriage to attach the new rod plate but the worst part was aligning the entire gantry when there's now two separate rods. The rods have to be aligned both to the frame and to each other. Keep in mind that you probably can't move the gantry by hand anymore because i really doubt you can turn both Z-axis rods at exactly the same speed. So now when moving the gantry for any reason you have to power up the motors and do it that way to keep the alignment in sync. It's a bit annoying (but obviously worth it). It took me longer to install the dual Z-axis kit than it did to do the entire extruder upgrade.
B**D
This+Klipper=being able to wait for Bambu prices to drop
This is a great upgrade! It improved my bed leveling and print quality and easy to install. This one couldn't connect to the original Z cable, so you will have to open up the bottom and run the cable to the mainboard. But hey, you've got an Ender, you're a pro at taking it apart by now!
W**L
Must buy if you have an ender 3
Really helps with the quality of prints and a very smooth fit and easy to install
N**E
This upgrade works, but only if configured correctly
Overall impression:Let me first say that this upgrade works wonders on larger print beds. I upgraded an Ender 3 with the 400x400mm EnderExtender kit and the sag from the x gantry was pretty significant, despite dialing in the v-slot wheels. I would HIGHLY recommend using this with a mainboard that supports two z-axis stepper motors on INDEPENDENT drivers. Independent control is required to perform automatic z-tilt adjustment in the firmware. The SKR mini e3 v3, for example, supports two z-axis motors, but they run off the same drivers and cannot be controlled independently. The SKR turbo v1.4 does support two z-axis motors with independent drivers.The kit:Comes with all the dual z motion components, as well as a bracket to move the PSU out of the way. It had absolutely no instructions, which is part of the reason I docked it for "Easy to Install". Don't use the included bearing blocks. At best the bearings are loosely fitted and not doing anything for alignment and at worst it is overconstraining the system.Install tips & procedure:1) make sure your vertical extrusions are parallel to each other and perpendicular to the rest of the frame. A carpenters square really helps here. Don't skip this step; it will be impossible to prevent lead screw binding if the frame is misaligned.2) Check the tightness of the v-slot wheels on the gantry (3 wheels on each side). They should all be tight enough that they cannot rotate freely without moving the gantry. If they are too loose, there is an eccentric nut on the inner wheels that can be adjusted with a wrench.3) Install the new plate onto the gantry and reassemble4) Before tightening the z-axis motor to the vertical extrusion, check that the lead screw is perfectly vertical. Calipers to measure the distance from the lead screw to the frame helps. If it is not vertical when the motor is touching the vertical extrusion, you'll need to print a spacer. Check Printables.com/Thingiverse.com for lots of options.Additional tips/tricks:-You can use the lead screw nut to fine tune the leadscrew until it is perfectly vertical-Use a small amount of grease (like lithium grease/marine grease) on both lead screws to reduce friction/binding
J**I
The installation instructions were vague....but.
I'm impressed with this upgrade. It was difficult in installing it because the directions were vague. Online instructions didn't help much either but I got it together. The printer is running a lot more quiet and smoother. I also installed the direct feed extruder kit. It's been very smooth all day!
S**N
Creality Ender3 V2 Dual "Z" Axis Upgrade
Purchased this to increase the accuracy of my Ender3 V2 3D printer. Instruction are a bit spartan and you have to open up the printer to get to the main control board to attach the wires for the servo. Wire routing is a challenge to get a clean install but all the parts are there and once installed printer does have better "Z" axis print quality due to the increased vertical axis stability. The second servo doesn't seem to need any synchronization with the existing servo. Just ensure that the jack screw is centered prior to turn on. You may need to lightly oil the jack screws on both sides after the install to ensure smooth operation.
K**K
Easy to install, not so easy to dial in.
Install is quick and easy. All parts are genuine and quality. Dialing in the printer after install was a bit tricky for me. Lubing the lead screws os a must and making sure both stepper motors are at the exact same height and distance from the gantry is equally important. Then the guides at the top of the gantry need to be dialed as well. Not to loose, not to tight. After all of that all you need to do now is make sure the z axis is level on the lead screws and to not adjust them by hand anymore. You'll never spin both lead screws exactly the same and now the z axis isn't level anymore. Like I said it. An be a bit challenging to dial, but not impossible.
J**H
Easy to put together
Got a ender 3 v2 as another printer. This was super easy to put together and works like it should.
Common Questions
Trustpilot
3 weeks ago
2 weeks ago
