


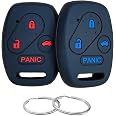
Cutting NOT Required - 2 Key Fob Keyless Entry Remote Shell Case & Pad fits Honda 2003-2012 Accord / 2006-2013 Civic EX / 2009-2015 Pilot /2005-2006 CR-V
Details
- Color4-Btn x 2
- MaterialPlastic
- BrandUSARemote
- Vehicle Service TypeCar
- Item Weight0.02 Kilograms

Description
🔑 Unlock hassle-free style with zero cutting required!
- DIY FRIENDLY - Simple installation with clear instructions—just transfer your original transponder chip.
- OEM QUALITY FIT - Designed to match OEM part numbers ensuring seamless integration and reliable performance.
- EFFORTLESS UPGRADE - Swap your worn key fob shell without any cutting or locksmith hassle.
- LIGHTWEIGHT DURABLE - Weighs just 0.634 oz with sturdy plastic construction for daily use.
- PERFECT COMPATIBILITY - Fits multiple Honda models from 2003-2015 including Accord, Civic EX, Pilot, and CR-V.
This 2-button key fob shell case fits a wide range of Honda models (2003-2015) and allows you to replace your worn or broken remote shell without any cutting or locksmith services. Made from durable plastic and weighing only 0.634 ounces, it requires transferring your original transponder chip for full functionality. Easy to install with OEM-level fit and finish.


Specifications
| Number of Buttons | 2 |
| OEM Part Number | KR55WK49308, MLBHLIK-1T, N5F-A05TAA, N5F-S0084A, OUCG8D-380H-A |
| Manufacturer | USARemote |
| Item Weight | 0.634 ounces |
| Package Dimensions | 5.75 x 3.74 x 0.79 inches |
| Item model number | 13 |
| Manufacturer Part Number | h-bless-4b-key-case |
Have a Question? See What Others Asked
Reviews
J**R
Take your time putting it together!
Got this for a 2005 Accord key where the plastic around the metal blade had started to crack badly. I expected this to be a very quick install, but it ended up being a lot more involved than I expected. Not surprisingly, the instructions are very limited - here are some things I found that I hope you may find useful.1) Your old metal blade may be very hard to remove from the old key housing. In my case, since it was already cracking around it, I was able to snap it out, but if the housing wasn't damaged around the blade you may need to use side cutters to cut the plastic off around it. Trying to lever the key out of the housing may result in bending it if the plastic isn't already cracked - so be careful.2a) If you have a transponder (I did! See the first and second photos) you may be in for a wild ride figuring out how to deal with it. To start, it was incredibly difficult to remove, in addition to being press fit into the top plastic shell with a little cap over it, one end had a small blob of glue holding it in place. I ended up needing to cut out the plastic around it with an x-acto knife to free it.2b) Once the chip is out, there's no way to mount it like in the OEM key, just a space where it can go. It will definitely rattle around, and if the key ever cracks open for any reason it will almost certainly be lost - meaning you won't be able to start the car. I ended up using two little blobs of hot glue, one in the bottom of the spot where the chip sits, and then one along the top edge of the remote unit. If you choose to use glue, make sure you use a glue that can be removed! I almost used epoxy but then realized I would never be able to get the remote out to change the battery! Hot glue will keep it from rattling around inside, but then can be peeled off later when it's time to change the battery.3) The plastic frame that slides over the blade fits VERY snugly. If you have any crud on the blade, especially around the bottom, it will have a hard time going down. Clean the blade with an alcohol wipe or similar to get around this. Once it's clean, note the orientation of the frame to the blade, there's a taper at the bottom that should be clear, then pull the frame down with even pressure one each side. The hole in the blade may not perfectly align with the holes in the frame. Mine still ended up going together just fine despite this, but be aware of it.4) The blade/frame piece does not float between the two halves of the housing, it mounts into the back half. There are grooves it will slide into, then click into place. Again, if you look closely, it will be intuitive.5) The halves hinge together from the back of the housing, at the key ring slot.6) Do not over-tighten the screw - if it's not going in smoothly, take it out and make sure it's aligned well. Once it's all the way in, don't "torque" it down - you'll either snap it in half or strip the threading in the housing.This is a good product at a great price and I expect it will hold up well, but take care when assembling it or you'll end up buying another one.
S**E
good solution
This works fine. I looked at some of the reviews with photos and vides and clearly there are people either purchasing the wrong key casing or not assembling it correctly. It's comical. I'm not a super handy person but I was able to figure it out. If it doesn't go in one angle try another. If you have the correct key casing it will work.In terms of durability it seems as durable as my old key was. I haven't had any issues with it breaking or feeling unstable. I would 100% suggest this to anyone before spending $80+ on an entire newly programmed key that's bound to break anyways.
H**.
Perfect and easy to set up!
Fit perfectly on my key and was super easy to set up. And the price was the best part. I had gone into my dealership’s shop to see if they could replace the case and they gave me some BS $350-$450 estimate!! For a tiny plastic casing for my key!!! They claimed some BS need to do this and that either the electronic components and yet here I am, bought this $6 (on sale) case and installed it myself easily in just a few short minutes!! Thank god I didn’t go with the dealership’s offer!
F**O
Prompt and Sturdy
Bought this for the wife's car. Usually wind up buying one every year or so. The fob arrived promptly and in good condition. Once the key was in place, the two halves didn't seem to fit perfectly, but good enough. Seems sturdy. Hopefully it'll be the last purchase.
W**G
Great quality for the price of a niche product
Solid quality, replaced both my cracked civic key fobs after the original lasted for 13 years...These are solid replacements for aftermarket parts, the screws luckily fit fine. The price for this quality is superb.Tip: i installed it wrong the first time and the case didnt close flush. I made the mistake of not knowing to slide the key holder thingy into the side of the shell (without the button holes) first; before screwing them together. After i slid it, then screwed them together, everything fitted perfectly.
O**.
Perfect fit for 2012
Perfect fit/replacement key holder for my 2012 Honda Civic. Both of my keys broke right where metal piece and the plastic holder connects. Simply remove the metal key and remote/button part and transfer to the new case.A bit tricky to place the new plastic tab (where you slide the metal key). There is a groove when placing the Tab back to the case.
Common Questions
Trustpilot
1 day ago
2 weeks ago
